Relational Database (DB)

A relational database is a digital representation of a relational model of data (how information is linked together).
A typical DB stores the organized data into tables (or relations).
In a table, the different columns correspond to the fields (or attribute) of our data and the rows correspond to the different records (or tuples).

Figure 1. A simple relational database (source: wikipedia).
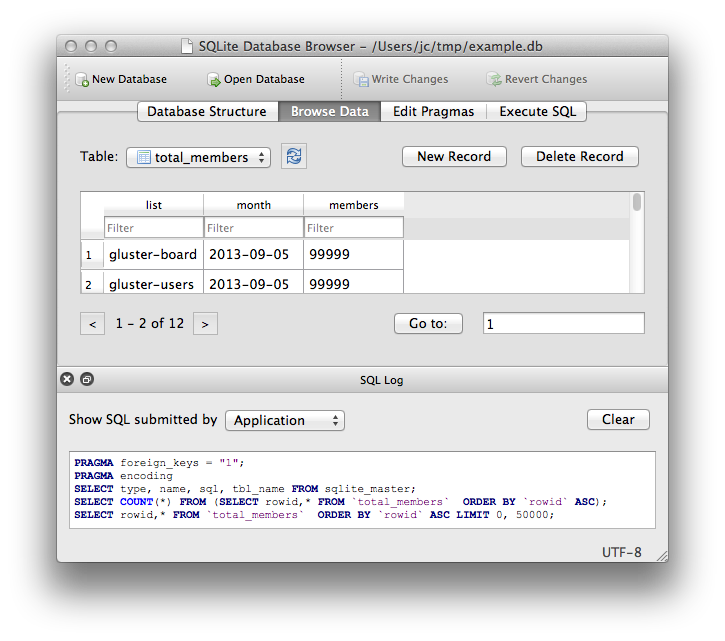
DB Tool for this tutorial

There are many digital database software out there. Some are easy to use, some are slightly more complicated. Some are free, some are proprietary. But they all have more or less the same basis, which we'll cover here (a portion of it anyway!)

Most of them can be used directly from the terminal, but some also provide a Graphical User Interface (GUI). A GUI can be extremely useful, especially when you start dealing with relational databases.

For this tutorial, we will use SQLite along with DB Browser for SQLite (GUI, Figure 1). You may already have SQLite on your machine.

Another popular option is MySQL. Both SQLite and MySQL are free, but MySQL is a heavier solution.

Organising your data

Say we want to create a database to represent a company's task force.

First, let's create a new database by clicking "New Database" in DB Browser.

We would like to have a list of each employee and the department to which they belong.

So, to organise the data, we could create a table like in Figure 3** and fill it with the data like in Figure 4, listing every employee and their respective department.

You would then have a straight forward way to represent the information.

The problem with this is that if you delete all entries (rows), you would not only delete your list of employees, but all departments as well. You would therefore have to start from scratch.

** weirdly, while creating this tutorial, my machine runs DB Browser in a sort of "frenglish", or french and english. You should have the same buttons in DB Browser on your machine with the proper translation!
You can refer to Figure 1 for some translations.

Figure 3. A first attempt: creating the whole company table. 
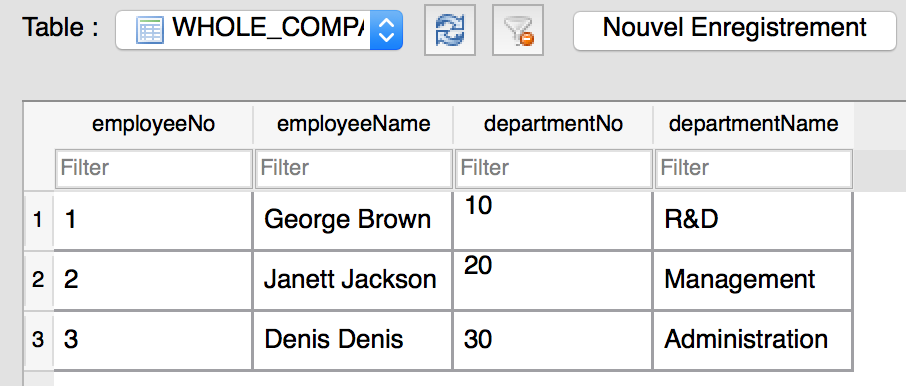
Figure 4. the whole company data.

Split and create relations

Instead, we want to keep independent entities separate and create relations between them. This process is called normalisation.

Using the principles of relational databases, the Employee and Department data can be restructured into two separate tables (say EMPLOYEE and DEPARTMENT), as shown in Figures 5 to 8.

We now have created the relation between the tables, having the department data independent to the employee data, and associating each employee to a specific department.

From Figures 6 and 7, we can see the relationship between DEPARTMENT and EMPLOYEE is built on the attribute departmentNo. This was made possible by setting up the "Foreign Key" during the creation of the table Employee.

Therefore, when we will want to insert a new employee along with his/her department, we will get an error if we do not provide a valid departmentNo. In other word, the insertion won't happen if we want to assign a department that doesn't exist.

OPTIONAL: For tips and rules on how to normalise your database properly, have a look at this link.

Note

I didn't use any PRIMARY KEY in the examples here. Using one is good practice. Your tables will be more consistent and it will accelerate your queries.

As w3schools puts it:

"The PRIMARY KEY constraint uniquely identifies each record in a database table.
Primary keys must contain UNIQUE values.
A primary key column cannot contain NULL values.
Most tables should have a primary key, and each table can have only ONE primary key."

You can set your primary key using the "PK" tick box (CP in my french example) for the ID column (e.g. employeeNo).

Note 2

We could have separated first name and last name to have more "atomic" data.

Figure 5. Creating the DEPARTMENT table. Figure 6. Creating the EMPLOYEE table. Figure 7. The DEPARTMENT data. Figure 8. The EMPLOYEE data.

Interacting with the database using SQL

Now that we have a structure for our database, it would be nice to be able to interact with it. For instance, it would be nice to add new records of employees or new departments. To do this, we use a language called SQL.

The GUI we use here helps lets us create tables and insert fields without having to type any line of SQL. However, once you know SQL, it's quite practical and easy to use.

The SQL language consists of a only few key words. Some keywords were already shown in the table creation figures (e.g. CREATE TABLE). Some important keywords are shown on the right.

More information about these keywords and how to use them can be found here. Also, ways to combine and use them is well explained on the Software Carpentry webpage.

Let's try SQL

Say we want to insert a new record in the DEPARTMENT table. We can do it as follow in the "Execute SQL" section of DB Browser:

INSERT INTO DEPARTMENT(departmentNo, departmentName)
VALUES(40,'Information Technology');


Similarly, if we want to display a list of all departments, we can run the following simple query:

SELECT DEPARTMENT.departmentName AS Name
FROM DEPARTMENT;


The results of the select should now also display the newly inserted department "Information Technology" like in Figure 9! The "AS" keyword lets you format the title of the result column.

Figure 9. Query result.

A bit more

Lets insert two new records in the EMPLOYEE table, both from the IT department:

INSERT INTO EMPLOYEE(employeeNo, employeeName, departmentNo)
VALUES(4, 'Jason Jason', 40), (5, 'Jack Jackson', 40);


Now, let's find all employees from IT, and also display their department name:

SELECT EMPLOYEE.employeeName AS EmpName, DEPARTMENT.departmentName AS DeptName
FROM EMPLOYEE
JOIN DEPARTMENT
ON EMPLOYEE.departmentNo = DEPARTMENT.departmentNo
WHERE DEPARTMENT.departmentName = 'Information Technology';


There you have it (Figure 10)! The JOIN*** links the two tables ON columns name departmentNo. The WHERE tells that we want only the records that relate to "Information Technology".

*** By default, JOIN means INNER JOIN in SQLite.

Figure 10. Query result #2.

Extra

If you want to know more about SQL itself, I encourage you to look at w3school SQL's tutorial or at this quick reference page. There are many DB tutorials online. Just google something like "SQLite tutorial" and you'll find something quickly (for instance, Software Carpentry)!

For example, here is a tutorial about MySQL.

Other topics you may want to read about (but not restricted to) are the different kinds of joins (e.g. left join, right join, ...), auto_increment a field to avoid typing them yourself, modify a table (ALTER TABLE), importing data, and some more advanced concepts such as inverted index, etc.

Have a look at the left side bar of w3school It's a good source of information about SQL (and for all kind of web development).

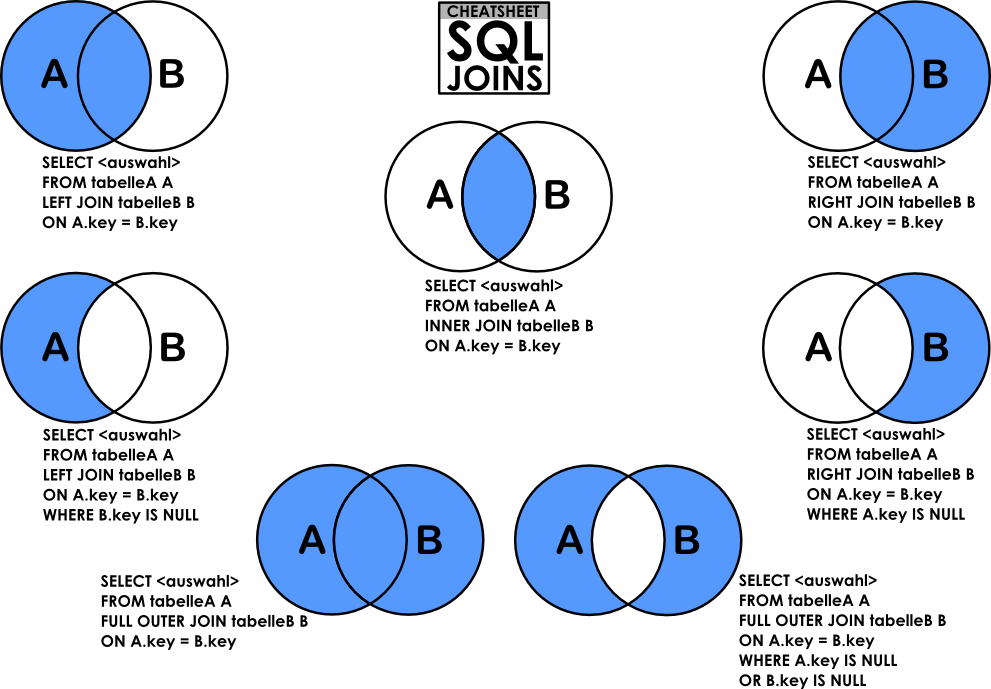
Figure 11. Venn diagrams of the different types of JOIN (source: dsin.files.wordpress.com).

Last but not least

At this point in the workshop, I encourage you to give it a go for yourself. Try to start a database related to your own data.

You can then either use your database by itself to organise and mine your information, or plug it with a software (e.g. OLE DB, loading a Python module, etc.) or a website (e.g. Ruby on Rails, some Python web server, or PHP).

Happy development!